- 我的帖子已经打上 开源推广 标签: 是
- 我的开源项目完整开源,无未开源部分: 是
- 我的开源项目已链接认可 LINUX DO 社区: 是
- 我帖子内的项目介绍,AI生成、润色内容部分已截图发出: 是
- 以上选择我承诺是永久有效的,接受社区和佬友监督: 是
以下为项目介绍正文内容,AI生成、润色内容已使用截图方式发出
前言
本教程的环境基于 jdk8 + langchain4j 0.35
教程源码放在这里了:
github.com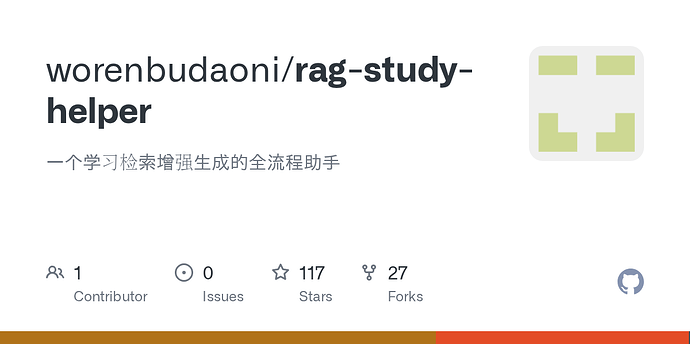
GitHub - worenbudaoni/rag-study-helper: 一个学习检索增强生成的全流程助手
一个学习检索增强生成的全流程助手
文章内容
因为内容比较多,我会从下面三个文章进行讲解,后续发布后会贴出来,这节讲:接入飞书WIKI文档
- RAG实现全流程:【开源、教程】RAG全流程实现(java+完整代码):第一弹
- 接入飞书WIKI文档:【开源、教程】RAG全流程实现(java+完整代码):第二弹
- 接口限流:令牌桶 + AOP
强烈建议先看完第一弹,不然后面代码有可能看不懂
实现逻辑
后面会有图文讲解的,这里就相当于大概介绍一下,看个大概就好,有不了解的不要先去搜,我后文都会讲,如果讲漏了麻烦评论一下,我改正
飞书开发者平台:
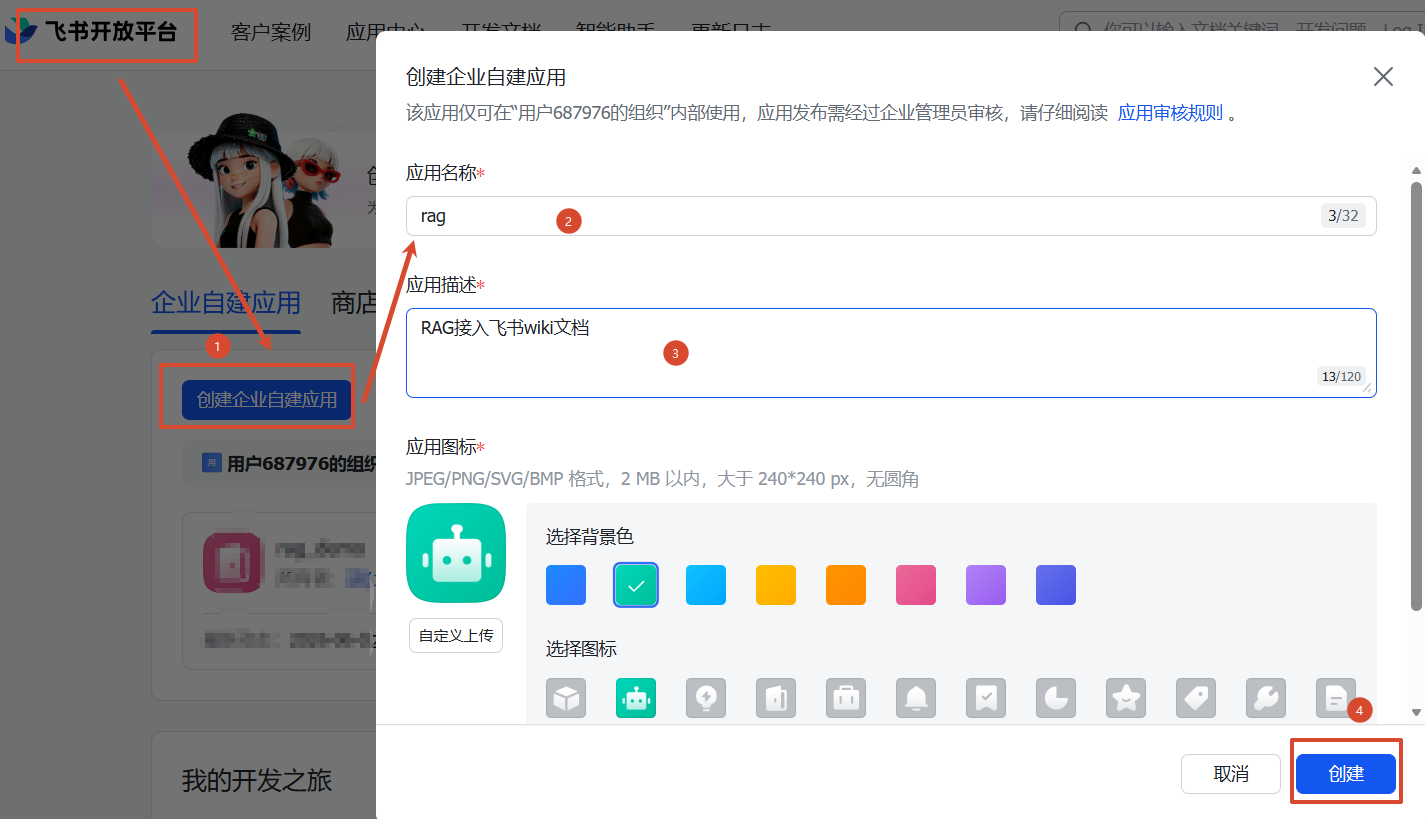
1、去飞书开发者平台创建一个应用
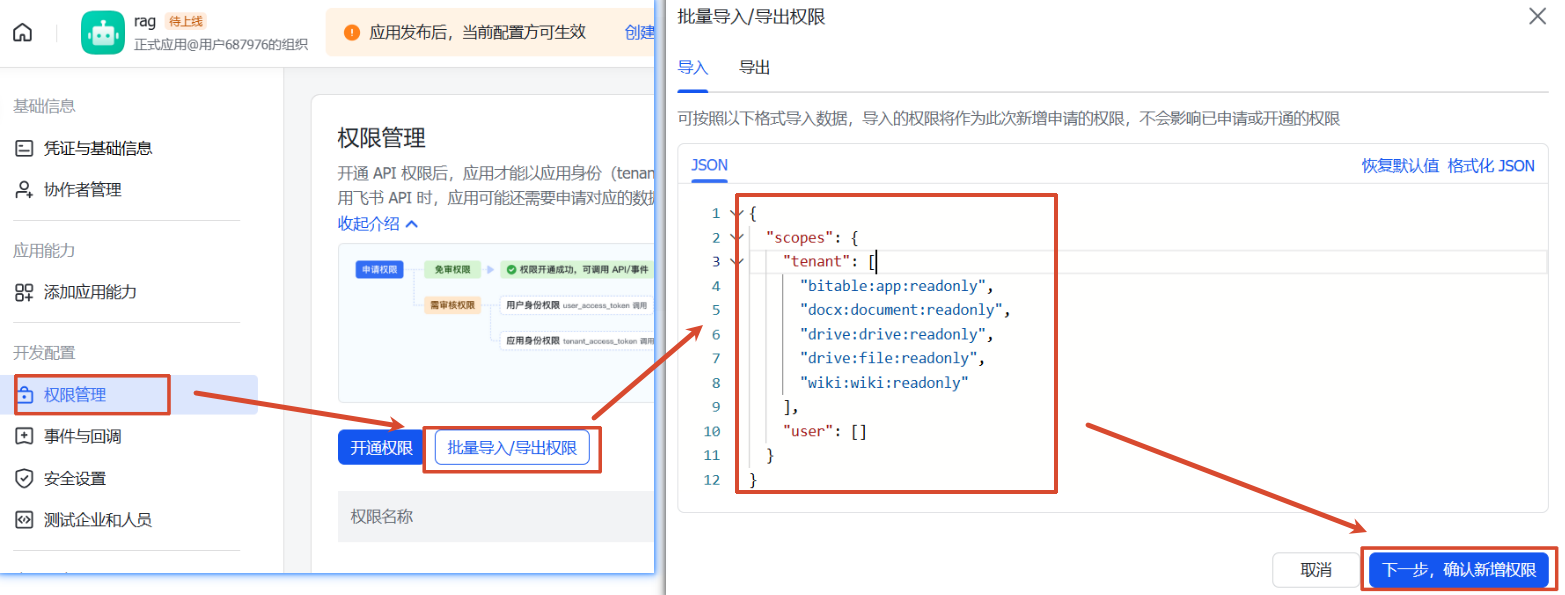
2、给应用赋予权限(权限管理 菜单)
3、给应用赋予机器人能力(添加应用能力 菜单)
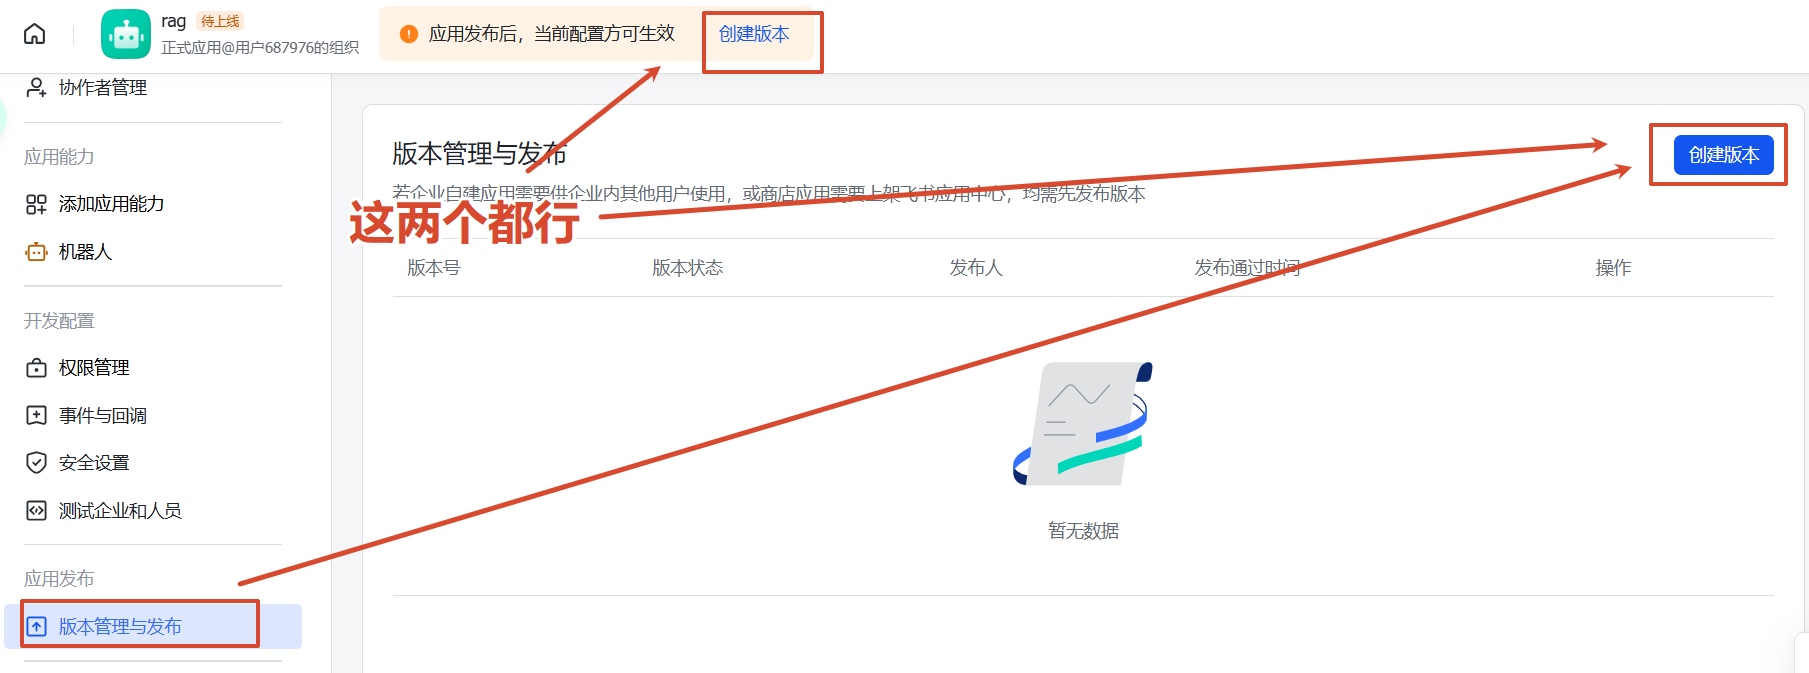
4、发布(版本管理与发布 菜单)
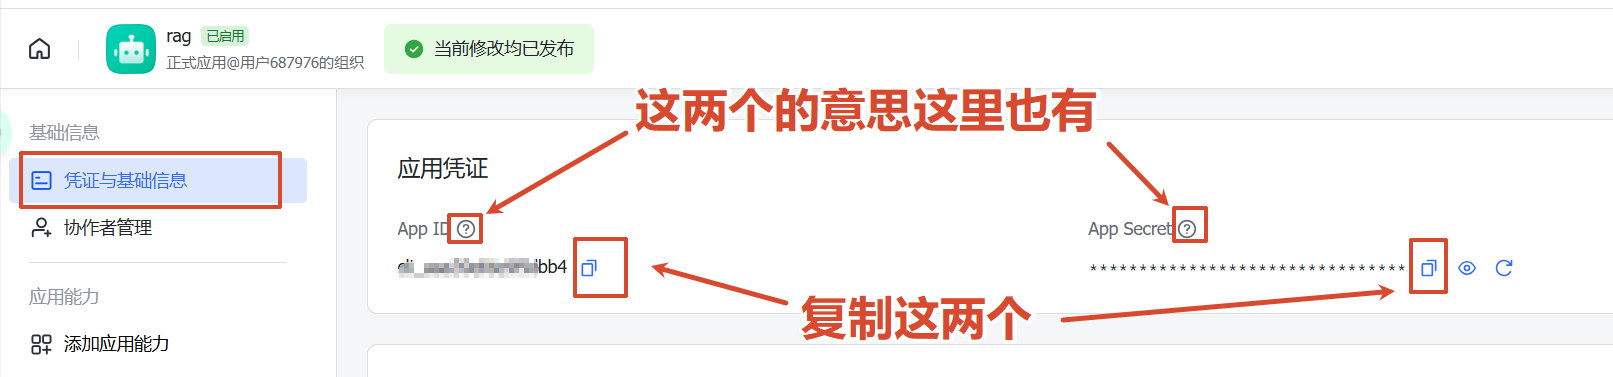
5、获取应用的app-id、app-secret(凭证和基础信息 菜单)
飞书app:
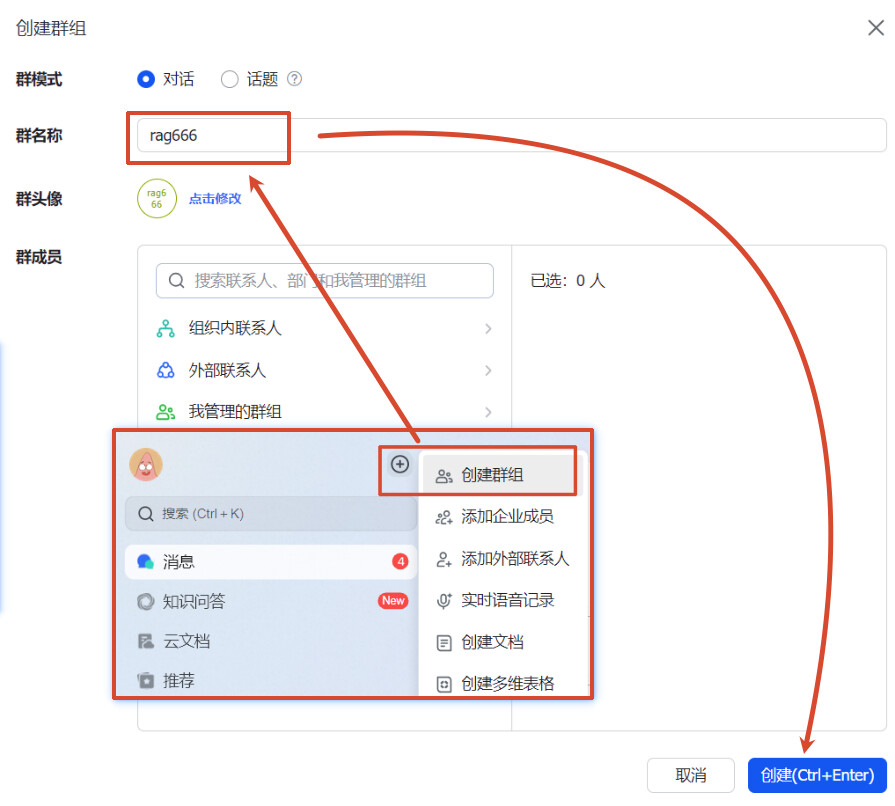
1、创建一个群聊
2、把机器人给拉进去
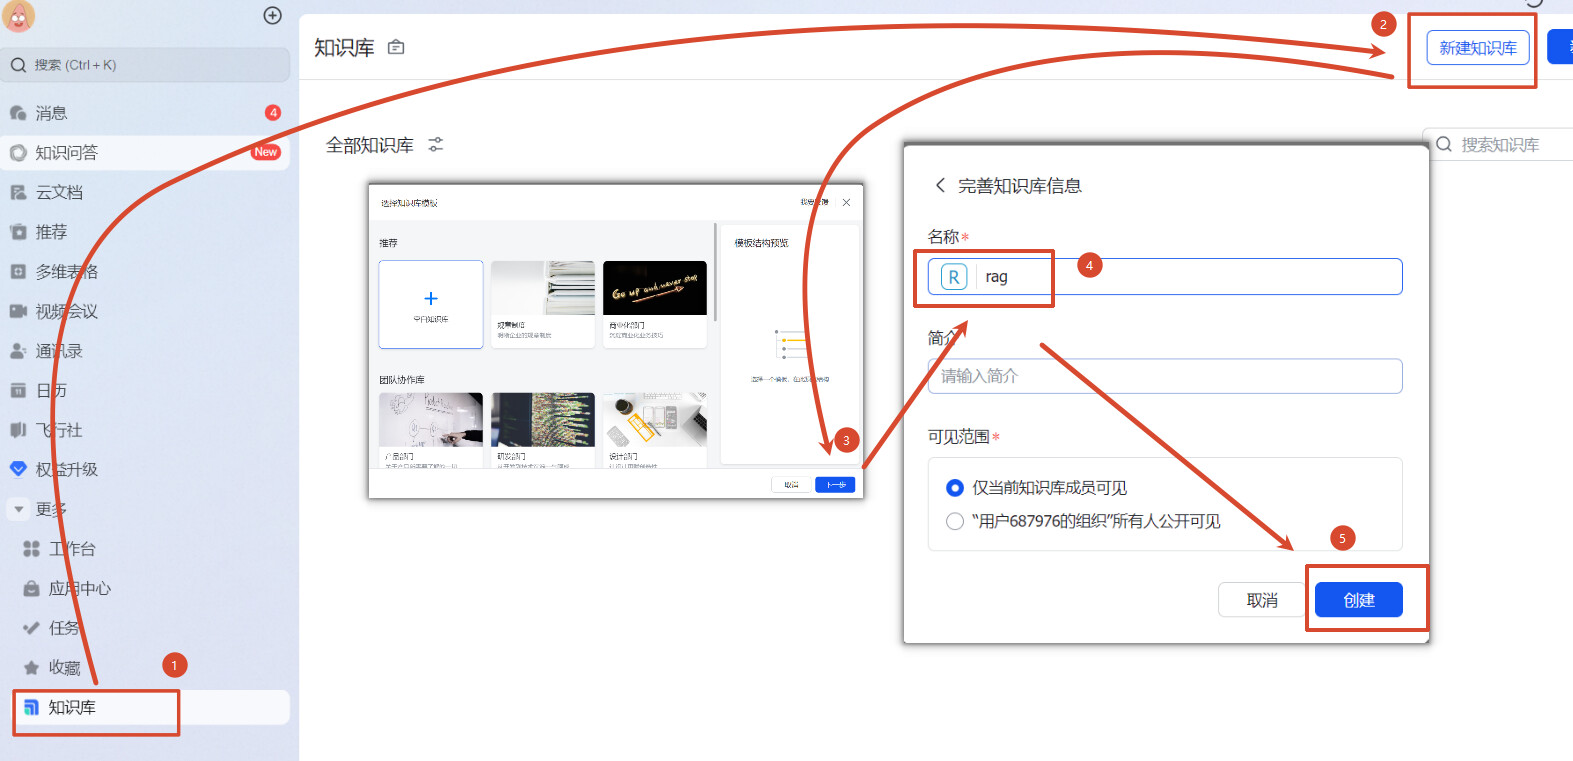
3、点击左边菜单的更多找到知识库,新建知识库(下面统一称为 WIKI)
4、添加群聊(机器人)为管理员:点 WIKI 进去会打开一个网站,左下角有个设置点进去,在成员设置->角色与权限->管理员,添加管理员,搜索我们刚才创建的有机器人的群聊并添加
5、在页面的连接处找到space-id,如:https://kcnvw23rzo5r.feishu.cn/wiki/settings/666666(666666就是我们要的space-id)
项目:
1、创建一个job,用来定时获取文档(下面为job启动后的流程)
2、通过app-id、app-secret获取tenant_access_token和expire
3、通过tenant_access_token和space-id获取文档信息(名字、更新时间、documentToken 等等)
4、通过documentToken去获取文档的内容(字符串)
5、走【开源、教程】RAG全流程实现(java+完整代码):第一弹的入库流程
一、飞书开发者平台
app-id、app-secret 是啥
app-id:应用的唯一标识
app-secret:应用的密钥,在创建应用时由平台生成,可用于获取app_access_token
1、飞书开放平台创建企业应用开发者后台 - 飞书开放平台
这里注意的是创建好应用后需要审核、启用,所以企业级的应用权限在领导手上,我们可以创建一个个人版的飞书账号来做实验
2、给应用赋予权限 (权限管理菜单)
直接复制我的也行
{
  "scopes": {
    "tenant": [
      "bitable:app:readonly",
      "docx:document:readonly",
      "drive:drive:readonly",
      "drive:file:readonly",
      "wiki:wiki:readonly"
    ],
    "user": []
  }
}
3、给应用赋予机器人能力 (添加应用能力菜单)

4、发布 (版本管理与发布菜单)
创建好后发布就行
5、获取应用的app-id、app-secret(凭证和基础信息菜单)
二、飞书app
space-id是啥
就是飞书知识库(WIKI)所对应的空间ID,我们找到这个空间就可以找到下面的文档
打个比方就是图书馆的书架,书架有个唯一标识(小说),我们根据这个书架ID(小说)去找下面所有的书
1、创建一个群聊
2、把机器人给拉进去

3、点击左边菜单的更多找到知识库,新建知识库(下面统一称为 WIKI)
4、添加群聊(机器人)为管理员
点 WIKI 进去会打开一个网站,左下角有个设置点进去,在成员设置->角色与权限->管理员,添加管理员,搜索我们刚才创建的有机器人的群聊并添加
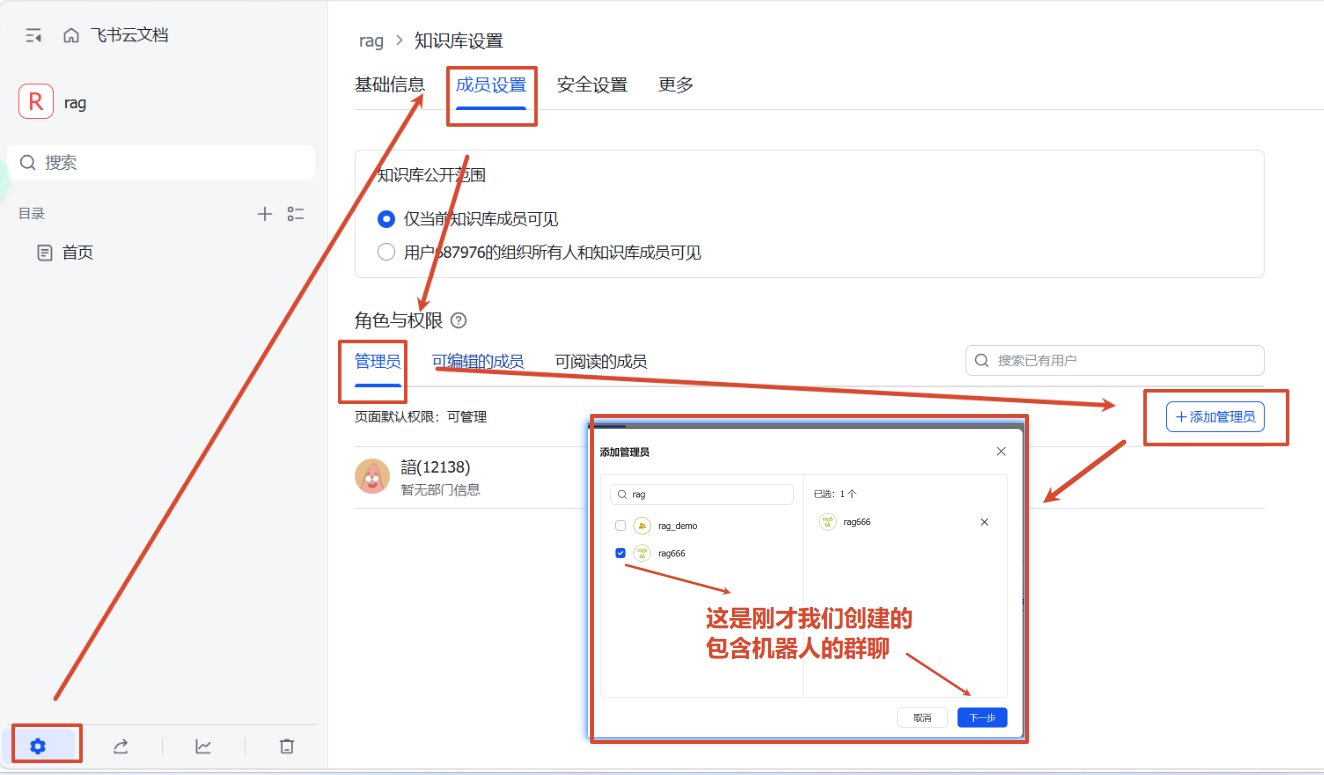
5、在页面的连接处找到space-id
如:https://kcnvw23rzo5r.feishu.cn/wiki/settings/666666(666666就是我们要的space-id)

三、项目
这里就不按照上面实现逻辑写的走了,我就按照代码里的讲解
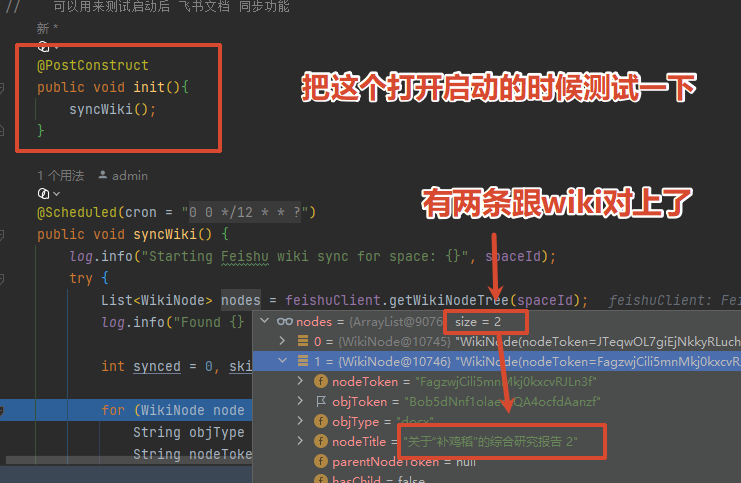
1、job总览(步骤拆解在后面)FeishuSyncService.java
// 没想加重框架,如果用xxl-job什么的,自己搬一下就行了
@Scheduled(cron = "${app.feishu.cron}")
public void syncWiki() {
    log.info("Starting Feishu wiki sync for space: {}", spaceId);
    try {
	    // 获取全部文档信息(通过app-id、app-secret、space-id)
	    // 这里逻辑后面会讲
        List<WikiNode> nodes = feishuClient.getWikiNodeTree(spaceId);
        log.info("Found {} nodes in wiki", nodes.size());
		// 成功数量,跳过数量(如果数据存在了关系型数据库且没有更新就跳过),失败数量
        int synced = 0, skipped = 0, failed = 0;

        for (WikiNode node : nodes) {
	        // 后缀
            String objType = node.getObjType();
            // 文档令牌 用来获取 文档内容
            String nodeToken = node.getNodeToken();
            // 更新时间判断是否需要跳过
            long updateTime = node.getUpdateTime();
			// 是否入库
            Documents doc = documentsMapper.selectOne(
                    Wrappers.<Documents>lambdaQuery()
                            .eq(Documents::getFeishuNodeToken, nodeToken)
            );
            // 文档是否更新是否需要跳过,这个更新时间不在where条件里面是因为后续要继续用到这个数据
            if (doc != null && doc.getFeishuUpdateTime() != null
                    && doc.getFeishuUpdateTime() == updateTime) {
                skipped++;
                continue;            }

            try {
	            // 文档内容
                String content;
                // 获取文件名
                String fileName;
                switch (objType) {
                    case "doc":
                    case "docx":
	                    // 获取文档内容
	                    // 这里逻辑就不讲了,我后面扔给飞书的文档,照着对接或者看我源码就好
                        content = feishuClient.getDocumentContent(node.getObjToken());
                        fileName = node.getNodeTitle() + "_文档";
                        break;                    case "sheet":
                        content = feishuClient.getSheetContent(node.getObjToken());
                        fileName = node.getNodeTitle() + "_表格";
                        break;                    case "bitable":
                        content = feishuClient.getBitableContent(node.getObjToken());
                        fileName = node.getNodeTitle() + "_多维表格";
                        break;                    default:
                        skipped++;
                        continue;                }

                // 如果是更新,先删旧向量和映射记录
                if (doc != null) {
                    // 查询旧文档相关的向量映射
                    List<DocumentChunks> oldChunks = documentChunksMapper.selectList(
                            Wrappers.<DocumentChunks>lambdaQuery()
                                    .eq(DocumentChunks::getDocumentId, doc.getId())
                    );
                    // 有两张表
                    // 第一张为文档库:记录文档标题、更新时间、创建人等信息
                    // 第二张为分片库:记录向量数据库插入后的向量ID
                    // 向量ID
                    List<String> vectorIds = oldChunks.stream()
                            .map(DocumentChunks::getVectorId)
                            .collect(Collectors.toList());
                    // 删除向量
                    embeddingStore.removeAll(vectorIds);

                    // 删除映射记录
                    documentChunksMapper.delete(
                            Wrappers.<DocumentChunks>lambdaQuery()
                                    .eq(DocumentChunks::getDocumentId, doc.getId())
                    );
                    // 删除文档
                    documentsMapper.deleteById(doc.getId());
                }

                // RAG 入库流程  (第一篇文章中亦有记载(跟第一章代码有些许出入,看完第一章后,直接看源码更佳))
                ingestionService.ingestFeishuDocument(fileName, content, nodeToken, updateTime, objType);
                synced++;
                log.info("  Synced: {} ({})", node.getNodeTitle(), nodeToken);
            } catch (Exception e) {
                log.error("  Failed to sync node: {} ({})", node.getNodeTitle(), nodeToken, e);
                failed++;
            }
        }

        // 清理远程已删除的文档
        // 这里的逻辑是
        // 第一次job执行:查询飞书wiki给了 A、B、C 三个文档入库
        // 后面有人在wiki中删了 C 文档
        // 第二次job执行:只有查询出 A、B 两个文档
        // 这时就要去数据库中和向量库中删除多余的 C 文档
        List<String> remoteTokens = nodes.stream()
                .map(WikiNode::getNodeToken)
                .collect(Collectors.toList());
        if (!remoteTokens.isEmpty()) {
	        // MySQL 查出本地多出的记录,只遍历需要删除的
            List<Documents> toRemove = documentsMapper.selectList(
                    Wrappers.<Documents>lambdaQuery()
                            .isNotNull(Documents::getFeishuNodeToken)
                            .notIn(Documents::getFeishuNodeToken, remoteTokens)
            );
            for (Documents removed : toRemove) {
                log.info("Document removed remotely, cleaning up: {} ({})", removed.getDocumentName(), removed.getFeishuNodeToken());
                List<DocumentChunks> chunks = documentChunksMapper.selectList(
                        Wrappers.<DocumentChunks>lambdaQuery()
                                .eq(DocumentChunks::getDocumentId, removed.getId())
                );
                List<String> vectorIds = chunks.stream()
                        .map(DocumentChunks::getVectorId)
                        .collect(Collectors.toList());
                // 向量数据库 删
                embeddingStore.removeAll(vectorIds);
				// 关系型数据库 分片库 删
                documentChunksMapper.delete(
                        Wrappers.<DocumentChunks>lambdaQuery()
                                .eq(DocumentChunks::getDocumentId, removed.getId())
                );
                // 关系型数据库 文档库 删
                documentsMapper.deleteById(removed.getId());
            }
        }

        log.info("Feishu wiki sync complete: synced={}, skipped={}, failed={}",
                synced, skipped, failed);
    } catch (Exception e) {
        log.error("Feishu wiki sync failed", e);
    }
}
2、递归获取知识库所有文档节点FeishuClient.java
这里其实没什么特别好讲的点,就是参考飞书文档,然后请求并解析
我在源码里也标记了文档的地址,所以这里放一个总体的查询地址
开发文档 - 飞书开放平台
/**
 * 获取 tenant_access_token(内部自动缓存和刷新)
 */
public synchronized String getAccessToken() throws IOException {
    if (cachedToken != null && System.currentTimeMillis() < tokenExpireAt) {
        return cachedToken;
    }
    String json = "{\"app_id\":\"" + appId + "\",\"app_secret\":\"" + appSecret + "\"}";
    // https://open.feishu.cn/document/server-docs/authentication-management/access-token/tenant_access_token_internal
    Request request = new Request.Builder()
            .url(baseUrl + "/open-apis/auth/v3/tenant_access_token/internal")
            .post(RequestBody.create(JSON, json))
            .build();
    try (Response resp = httpClient.newCall(request).execute()) {
        JsonNode body = objectMapper.readTree(resp.body().string());
        if (body.get("code").asInt() != 0) {
            throw new IOException("Failed to get access token: " + body);
        }
        cachedToken = body.get("tenant_access_token").asText();
        // tenant_access_token 的最大有效期是 2 小时
        // 7200 是秒
        int expire = body.get("expire").asInt(7200);
        // 防御性编程 免得刚好过期 由于网络延时 造成接口调用失败
        tokenExpireAt = System.currentTimeMillis() + (expire - 60) * 1000L;
        return cachedToken;
    }
}

/**
 * 递归获取知识库所有文档节点。
 */
public List<WikiNode> getWikiNodeTree(String spaceId) throws IOException {
    List<WikiNode> allNodes = new ArrayList<>();
    collectNodes(spaceId, null, allNodes);
    return allNodes;
}

private void collectNodes(String spaceId, String parentNodeToken, List<WikiNode> result) throws IOException {
    List<WikiNode> currentLevelNodes = new ArrayList<>();
    String pageToken = null;
    do {
        // https://open.feishu.cn/document/server-docs/docs/wiki-v2/space-node/create
        StringBuilder url = new StringBuilder(baseUrl + "/open-apis/wiki/v2/spaces/" + spaceId + "/nodes");
        if (parentNodeToken != null) {
            url.append("/").append(parentNodeToken).append("/children");
        }
        url.append("?page_size=50");
        if (pageToken != null) {
            url.append("&page_token=").append(pageToken);
        }

        Request request = new Request.Builder()
                .url(url.toString())
                .header("Authorization", "Bearer " + getAccessToken())
                .get()
                .build();

        try (Response resp = httpClient.newCall(request).execute()) {
            JsonNode body = objectMapper.readTree(resp.body().string());
            if (body.get("code").asInt() != 0) {
                log.error("Wiki API error for URL [{}]: {}", url, body);
                break;            }

            JsonNode items = body.path("data").path("items");
            for (JsonNode item : items) {
                WikiNode node = new WikiNode();
                // 节点token
                node.setNodeToken(item.path("node_token").asText());
                // 对应文档类型的token,可根据 obj_type 判断属于哪种文档类型。
                node.setObjToken(item.path("obj_token").asText());
                // 文档类型,对于快捷方式,该字段是对应的实体的obj_type。
                // 可选值有:
                // doc:旧版文档 sheet:表格 mindnote:思维导图 bitable:多维表格 file:文件 docx:新版文档 slides:幻灯片
                node.setObjType(item.path("obj_type").asText());
                // 文档标题
                node.setNodeTitle(item.path("title").asText());
                node.setParentNodeToken(parentNodeToken);
                // 是否有子节点
                node.setHasChild(item.path("has_child").asBoolean(false));
                // 文档最近编辑时间
                String editTime = item.path("obj_edit_time").asText();
                node.setUpdateTime(Long.parseLong(editTime.isEmpty() ? "0" : editTime));
                currentLevelNodes.add(node);
            }

            pageToken = body.path("data").path("page_token").asText(null);
        }
    } while (pageToken != null && !pageToken.isEmpty());

    // Add all nodes from this level, then recurse into children
    result.addAll(currentLevelNodes);
    for (WikiNode node : currentLevelNodes) {
        if (node.isHasChild()) {
            collectNodes(spaceId, node.getNodeToken(), result);
        }
    }
}
四、测试
1、导入文档
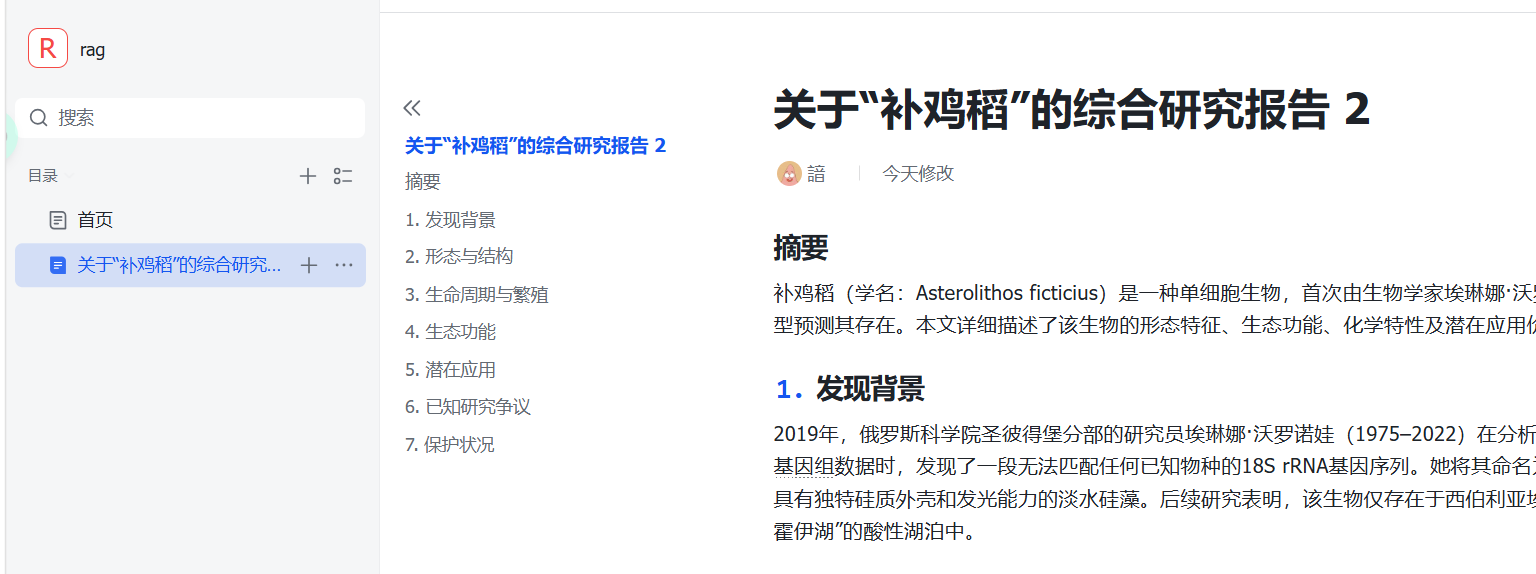
还是拿这个 补鸡稻 作为测试案例
2、配置 app-id、app-secret、space-id和sync-enable
我这里通过 jvm 运行参数注入,免得又把 apikey 给上传到 github 了
sync-enable 记得为 true,不然不注册 spring bean

3、运行时发现文档可以查询到,并且入库了
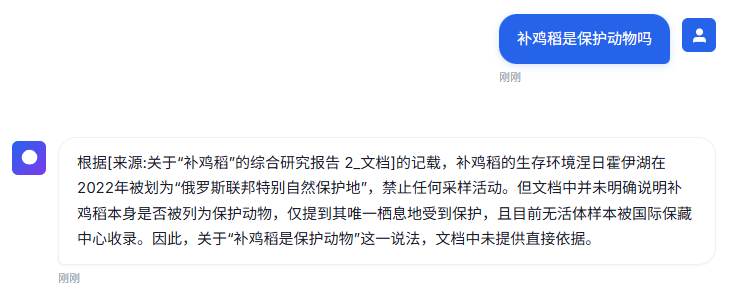
4、提问
5、测试结束,完结撒花
2 个帖子 - 2 位参与者